给大家推荐一款实用的项目TrWebOCR,基于开源项目 Tr 构建的的中文离线OCR,识别率媲美大厂,并且提供了易用的web页面及web的接口,方便日常工作使用或者其他项目程序来调用API~
TrWebOCR 特点:
离线使用: 不用联网,数据更安全
识别准: 中文效果媲美大厂效果
简单调用: 自带网页界面,打开浏览器就能用,也支持API调用
一键部署: 用Docker三分钟就能跑起来
部署
飞牛 Compose方式部署代码
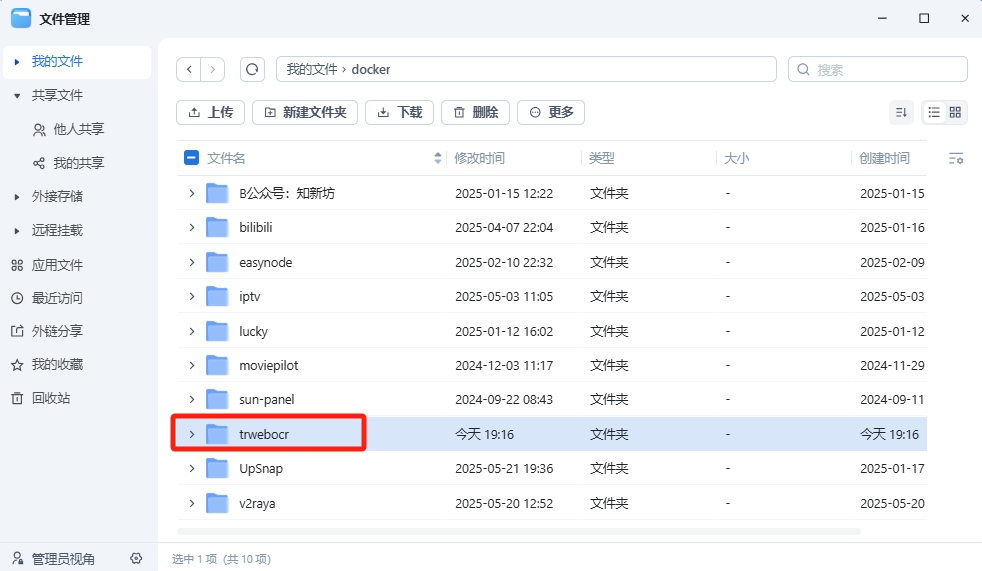
1️⃣我们需要先创建一个路径,这个路径储存我们的docker-Compose.yml的文件和配置文件

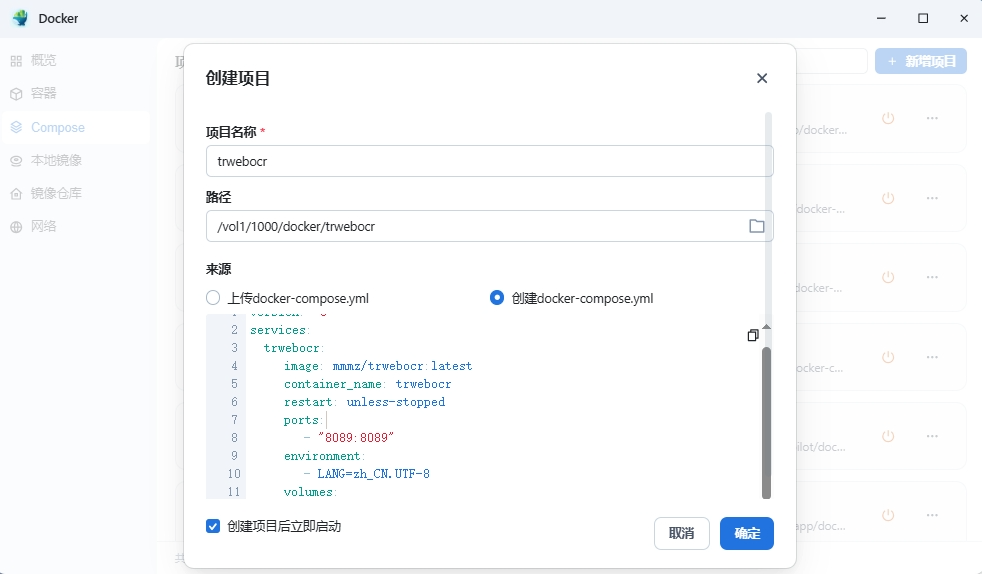
2️⃣打开Docker,Compose新增项目->输入项目名称->设置路径->上传或者创建docker-compose.yml把下面代码复制进去,点击完成直至构建完成

🐳Docker compose
version: '3'
services:
  trwebocr:
    image: mmmz/trwebocr:latest
    container_name: trwebocr
    restart: unless-stopped
    ports:
      - "8089:8089"
    environment:
      -.UTF-8
    volumes:
      - ./data:/app/tr_web/data  # 持久化OCR数
使用
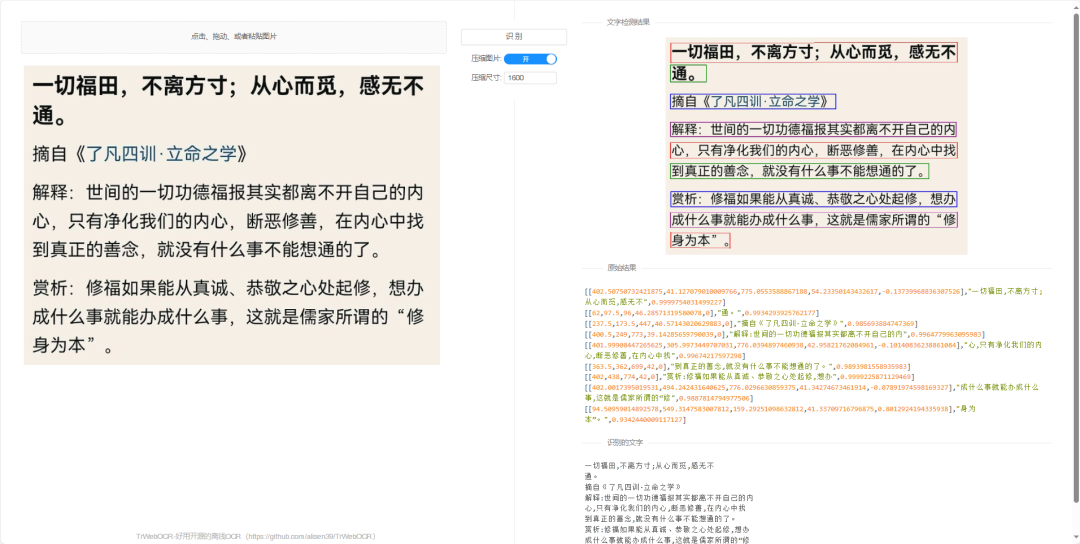
浏览器访问 http://ip:8089 访问web页面,就可以直接使用

识别演示

识别出来的原始数据结构
识别出的文字块,格式为:[[坐标信息], "识别文字", 置信度]
坐标信息 :文字在 图片中的位置(像素坐标)
识别文字 :OCR识别的具体内容
置信度 :识别准确率(0.99表示99%可信)
也有缺点,识别竖排文字的时候他还是横着识别,不过我试了微信截图识别文字、网上一些免费的OCR 也一样,都是不能竖排文字识别。
官方接口实例:
Python 使用File上传文件
import requests
url = 'http://ip:8089/api/tr-run/'
img1_file = {
    'file': open('img1.png', 'rb')
}
res = requests.post(url=url, data={'compress': 0}, files=img1_file)
Python 使用Base64
import requests
import base64
def img_to_base64(img_path):
    with open(img_path, 'rb')as read:
        b64 = base64.b64encode(read.read())
    return b64

url = 'http://ip:8089/api/tr-run/'
img_b64 = img_to_base64('./img1.png')
res = requests.post(url=url, data={'img': img_b64})
使用Python和OpenCV实现的简易拍照OCR程序
添加GUI界面,在配合程序就能写一个拍照识别小程序
import cv2
import requests
import base64
from PIL import Image, ImageDraw, ImageFont
import numpy as np
import time

# 设置OCR服务地址
OCR_URL = "http://ip:8089/api/tr-run/"

def capture_and_recognize():
    # 初始化摄像头
    cap = cv2.VideoCapture(0)

    print("按空格键拍照,ESC键退出")

    while True:
        ret, frame = cap.read()
        if not ret:
            print("无法获取摄像头画面")
            break

        # 显示实时画面
        cv2.imshow("拍照识别 - 按空格拍照", frame)

        key = cv2.waitKey(1)

        # 按ESC退出
        if key == 27:
            break

        # 按空格拍照并识别
        elif key == 32:
            # 保存临时图片
            temp_file = "temp_capture.jpg"
            cv2.imwrite(temp_file, frame)
            print("拍照成功,正在识别...")

            # 调用OCR接口
            try:
                with open(temp_file, "rb") as f:
                    img_base64 = base64.b64encode(f.read()).decode()

                data = {
                    'img': img_base64,
                    'compress': 800  # 压缩图片加快识别速度
                }

                response = requests.post(OCR_URL, data=data)
                result = response.json()

                if result['code'] == 200:
                    # 显示识别结果
                    show_result(frame, result['data']['raw_out'])
                else:
                    print(f"识别失败: {result['msg']}")

            except Exception as e:
                print(f"识别出错: {str(e)}")

    # 释放资源
    cap.release()
    cv2.destroyAllWindows()

def show_result(image, text_blocks):
    # 将OpenCV图像转换为PIL格式
    image_pil = Image.fromarray(cv2.cvtColor(image, cv2.COLOR_BGR2RGB))
    draw = ImageDraw.Draw(image_pil)

    # 使用中文字体(需要提前下载或使用系统自带字体)
    try:
        font = ImageFont.truetype("simhei.ttf", 20)
    except:
        font = ImageFont.load_default()

    # 绘制识别结果
    for block in text_blocks:
        coords, text, confidence = block
        x1, y1, x2, y2 = coords

        # 绘制文字框
        draw.rectangle([x1, y1, x2, y2], outline="red", width=2)

        # 绘制识别文字
        draw.text((x1, y1-25), f"{text} ({confidence:.2%})", fill="red", font=font)

    # 转换回OpenCV格式显示
    result_image = cv2.cvtColor(np.array(image_pil), cv2.COLOR_RGB2BGR)

    # 显示结果
    cv2.imshow("识别结果", result_image)
    print("识别完成,按任意键返回拍照界面...")
    cv2.waitKey(0)
    cv2.destroyWindow("识别结果")

if __name__ == "__main__":
    capture_and_recognize()
官方接口文档
https://github.com/alisen39/TrWebOCR/wiki/%E6%8E%A5%E5%8F%A3%E6%96%87%E6%A1%A3


